Document To Zip Skill
Bundling Documents Together
Your Mattr AI Agents often process multiple documents related to a single case, like a loan application with various supporting files. Once these documents are processed, you might need to send them all together as one package for emailing, downloading, or archiving. That's where the Document To Zip Skill becomes incredibly useful!
Packaging Loan Application Documents for an Underwriter
Imagine your workflow collects all the necessary documents for a loan application: the application form, credit report, income statements, and ID proofs. After your AI Agent has extracted key data and performed initial checks, you need to send all these individual files to a loan underwriter as a single, organized ZIP file.
The Challenge:
Sending multiple separate documents can be cumbersome and prone to errors. Underwriters prefer to receive all related documents in one consolidated, easy-to-manage file.
The Solution:
By incorporating a Document To Zip Skill into your workflow, you can automatically combine all the individual loan application documents into a single, neat ZIP archive. This makes it effortless to send, store, and review the complete application package.
Setting Up the Document To Zip Skill
Let's walk through how to set up this Skill to bundle your loan application documents.
Locate the Skill: Drag and drop the Document To Zip Skill onto your Workflow Builder canvas. Place it in your workflow after all the individual documents have been uploaded or fetched and are ready to be bundled.
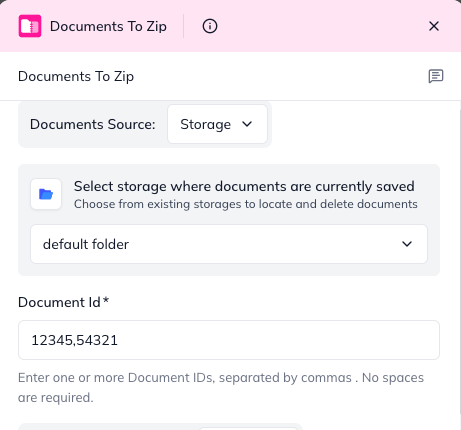
Configure "Documents": This tells the Skill which files to include in your ZIP archive.
Click on the Document To Zip Skill to open its configuration panel.
In the "Documents" section, you'll provide a list of Document IDs for all the files you want to zip.
Tip for Automation: You'll typically get these Document IDs from outputs of previous Skills (e.g., from a "Document Upload" or "Document Fetch" Skill).
For each document, you'll also specify its Source (Conversation if it's a temporary file, or Storage if it's from your persistent storage). If Source is Storage, you can optionally add its StoragePath.
Choose "Output Storage": Decide where the newly created ZIP file should be saved.
Conversation: For temporary ZIP files that are only needed for the current conversation (e.g., if you're immediately emailing it).
Storage: For persistent storage of the ZIP file within your Mattr system (e.g., for long-term archiving). If you choose this, you'll also need to provide the StoragePath (your storage bucket, like loan-package).
Set "Zip File Name" (Optional): You can give your new ZIP file a custom name that makes it easy to identify (e.g., LoanApplication_CustomerXYZ.zip). If you leave this blank, the Skill will generate a default name like bundle-<timestamp>.zip.

Understanding the Outcome (Skill Output)
After the Document To Zip Skill runs, it will pass on information about your new ZIP file to the next steps in your workflow.
zipDocumentId: This is the unique ID for the newly created ZIP file. This ID is what you'll use if you want to fetch, delete, or link to this ZIP file in subsequent Skills (e.g., to attach it to an email).
storageType: Tells you where the ZIP file was saved (conversation or storage).
storagePath - The optionally-provided StoragePath to a specific subfolder.
mimeType: This will always be application/zip, confirming it's a ZIP file.
statusCode: The HTTP status of the operation (e.g., 200 Created for success, or 404 Not Found if an input document was missing).
error - If the operation failed, this field will contain a message about what went wrong.
By using the Document To Zip Skill, your workflows can effortlessly bundle related documents, making file management, sharing, and archiving streamlined and efficient!
Last updated